The Laggard's Guide to Getting Started with Asp.net 5 Using Yeoman.
Note: Asp.net 5 has been renamed to ASP.NET Core 1.0. The instructions below are unaffected.
Asp.net 5 represents a complete re-invention of the .net platform. The foundations have shifted completely. Throw out everything you ever thought you knew about computers, and get ready to have your hair blown back, your face melted and your whole outlook on life re-defined.
If you are anything like me then you've let much of this stuff zoom past you over the last year. Well it's time to get up to speed my friend.
Here are the steps to get up and running with Asp.net 5, using Yeoman. In summary:
- Optional: Install vs2015 including "Microsoft Web Developer Tools"
- Install Asp.Net 5
- Use dnvm to upgrade your dot net versions and set active version
- Install chocolatey
- Install node.js, using choco (in order to get npm)
- Install visual studio 'code'
- Install yo, using npm
- Install generator-aspnet, using npm
- Generate a new site, using 'yo aspnet'
- Visit the new site in vscode
- Restore all nuget packages for the project
- Serve the website locally using dnx web
- Browse to http://localhost:5000
And now I'll go through them in slightly more detail -- but still very quickly.
If you want to go through this in a more comprehensive manner, I recommend this pluralsight course "Building a Web App with ASP.NET 5, MVC 6, EF7 and AngularJS by Shawn Wildermuth".
1. Optional: Install vs2015 and make sure to include "Microsoft Web Developer Tools"
We're not going to be using vs2015, but using vs code instead. Still I expect the installation gods will devour your soul if you don't install vs 2015 before installing asp.net 5. So consider doing this first.
- Install Visual Studio 2015
- And be sure to specify that you want the "Microsoft Web Developer Tools"
Come back when you have that done, a few hours later. If you're living in Australia where our "internet" is made from a few frayed old copper strands, add one extra month.
2. Install Asp.Net 5
This step, and all subsequent steps, are mandatory.
- Go to Get.Asp.Net
- Click on "Install For Windows".
If you're not on windows, then follow for the other instructions.
Alternatively, read the detailed install instructions.
3. Use dnvm to upgrade your dot net versions, get new versions and set active version
Once asp.net is installed, you can run dnvm. dnvm is a commandline tool for managing which version of the .NET runtime to use.
At a command prompt, type each of these commands in turn:
dnvm upgrade
dnvm install 1.0.0-rc1-final -arch x64
dnvm install 1.0.0-rc1-final -r coreclr
dnvm install 1.0.0-rc1-final -r coreclr -arch x86
dnvm use 1.0.0-rc1-final -r clr -arch x64 -p
dnvm alias default 1.0.0-rc1-final -r clr -a x64
dnvm list
dnx --version
These commands, in order, will:
dnvm upgrade:
Install the latest 32 bit version of the runtime, make it active and assign the default alias to point at it
dnvm install 1.0.0-rc1-final -arch x64:
Install the 64 bit version of the common language runtime (clr)
dnvm install 1.0.0-rc1-final -r coreclr:
Install the 32 bit version of the "core" clr
dnvm install 1.0.0-rc1-final -r coreclr -arch x86:
Install the 64 bit version of the "core" clr
dnvm use 1.0.0-rc1-final -r clr -arch x64 -p:
make the 64 bit clr "active", and persist this setting. (i.e. not just for the life of this console session)
dnvm alias default 1.0.0-rc1-final -r clr -a x64:
apply the alias "default" to the 64 bit clr.
dnvm list:
list all of the dot net versions.
dnx --version:
show the version of the dot net execution environment.
You don't need to install all of those clr's. But knowing that you can is fundamental to the shift that is occurring.
(I don't know why .net is now back at version 1.0. Perhaps they forgot to drink their ration of the semantic versioning kool-aid.)
4. Install chocolatey
You may already have chocolatey, in which case, skip this step. Otherwise. From a console window with administrative privileges type:
@powershell -NoProfile -ExecutionPolicy Bypass -Command "iex ((new-object net.webclient).DownloadString('https://chocolatey.org/install.ps1'))" && SET PATH=%PATH%;%ALLUSERSPROFILE%\chocolatey\bin
Chocolatey is now installed on your machine and available in your path.
If you're using an OS other than windows you probably have a package manager already, with which to perform the next step.
By the way: Rob Reynolds who maintains Chocolatey: what a hard worker! Thanks for your efforts Rob!
5. Install node.js, using choco (in order to get npm)
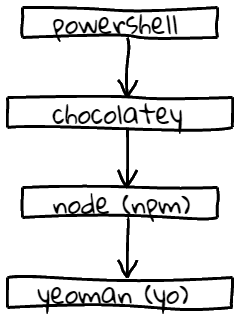
Use chocolatey to install node.js. We're doing this in order to get npm, so that we can get yo, so that we can generate aspnet projects at the commandline.
Yes -- it is a convoluted process. But don't let that stop you. Just do it once and get on with your life.
Here's a simplified diagram that might help:

Sorry, wrong diagram, this is the one I meant:

choco install nodejs
You now have node.js and with it, npm.
At this point you can add "rockstar web developer" to your json resume.
To test out node.js, type "node" in a console. Now enter:
console.log("hello from node");
And you should see "hello from node" echoed to the screen. Exit node with ".exit". Or by hitting Ctrl-C a few times.
6. Install Visual Studio 'Code'
Visual Studio Code is a cross-platform code editor optimized for building and debugging last year's crop of web and cloud applications. In 6 months time it will probably be abandoned on the side of the information superhighway, but for now it works beautifully.
- Install VSCodeSetup.exe
Or follow the windows install instructions.
7. Install yo (using npm)

yo is the scaffolding tool that is part of Yeoman
You install it using npm (the nodejs package manager) that was installed as part of node.js, above.
npm install yo -g
The "-g" here means: 'global'. So it is available from future console sessions. Not unlike the "-p" above.
8. Install generator-aspnet (using npm)
yo's purpose is to "scaffold" applications, i.e. construct the bare-bones of an application, that serve as a starting point for further development. Think 'Dos On Dope', but with slightly larger concept count.
Yo doesn't actually do the generating itself -- it gets "generators" to do all the actual work. This seems like a pretty good deal for Yeoman who outsources all of his work but still takes the credit. For example, to scaffold an aspnet5 application yo needs the aspnet generator. Download it, using npm, like this:
npm install -g yo generator-aspnet
Now you have all of the pieces in place and can build a website. Try not to burst with the anticipation that pushes all of your blood into your head.
(To see a list of yeoman generators available from npm, type: npm search yeoman-generator, and to see the generators installed locally type: yo --help)
9. Generate a new site (using 'yo aspnet')
Simply type:
yo aspnet
Press "3" to select "Web Application".
Type the name of the name application, e.g. "HelloFromYo".
Press enter. A whole lot of very interesting text will scroll by in a flash.
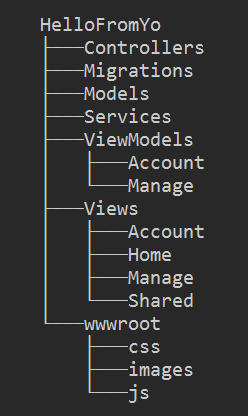
At the end of it, you'll have a directory structure like this:
HelloFromYo
    +---Controllers
    +---Migrations
    +---Models
    +---Services
    +---ViewModels
    ¦   +---Account
    ¦   +---Manage
    +---Views
    ¦   +---Account
    ¦   +---Home
    ¦   +---Manage
    ¦   +---Shared
    +---wwwroot
        +---css
        +---images
        +---js

10. Visit the new site in vscode
from the console type:
cd HelloFromYo
code .
And visual studio code will open the current folder.
Otherwise, from within vscode choose "open folder" and navigate to the newly created website's root folder.
11. Restore all nuget packages for the project
Within Visual Studio Code, navigate to any of the code files within the project.
VS Code will soon wake up and notice that the relevant nuget packages are not available.
A note at the top of the screen will say:
"There are unresolved dependencies from 'project.json'. Please execute the restore command to continue."
Click "Restore."
This will call the dnu commandline utility, to download the nuget packages used by the project. (You could've performed this yourself using 'dnu restore' and 'dnu build')
It will download something like 265 nuget packages. Because "componentization" is the special something that has been missing from your life all this time.
Your generated web app is now ready for launch. Be excited.
12. Serve the website locally, using dnx web
From the console, while in the root folder of the webapplication, type:
dnx web
This will launch the kestrel webserver, hosting the website. You will see from the console the exact port number, but it will probably be 5000.
Why does it launch the kestrel webserver? Because in the file "project.json" under "Commands" it says the Web command uses "Microsoft.AspNet.Server.Kestrel". I mention that, just to give you a taste of the magic.

13. Browse to http://localhost:5000
Browse to http://localhost:5000 to visit the site.
And there it is, in all its stupendous glory.
Now sit down and have a long think about the good old days, when all you needed to do to get into a development environment was restart the Commodore 64 and type '10 print "hello"[enter]20 Goto 10[enter]Run'.
Then stop thinking about all that and start looking through the code to see how it works. There's some fascinating magic in there to be sure.
Better learn it quick, before it's time to throw it all out again and rewrite everything in $NextLang.
My book "Choose Your First Product" is available now.
It gives you 4 easy steps to find and validate a humble product idea.